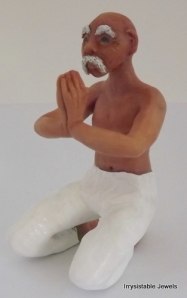
Finished the Polymer clay Martial Arts Sculpture now on to the next


With much trial and error I have finally finished this sculpture. I learned so much in doing this one and made a ton of mistakes. I’m hoping that I remember those goof ups next time.


I plan on trying to recreate my Grand-Daughter next and I’m sure that will be full of special challenges too but I’ll give it a go and see what happens. I hope you’ll follow me along the way and maybe learn something too. I’m going to post step by step pics of the process so you can see how I do it from the very beginning. I have ordered some supplies and as soon as they arrive I’ll be starting the new sculpture. Should be around Wednesday or Thursday I think.

A good friend on mine (Harry Wood of Oscar crow) has offered to send me an anatomy book which will help a great deal in getting things right and in proportion. He’s so helpful and knowledgeable. Check out his blog for tons of tutorials.  http://www.oscarcrow.blogspot.com/   I highly recommend it!

This is the photo I plan on basing the next creation from but as you all know that can change when flubs appear..LOL  Isn’t she adorable! This is actually an old photo of her but it’s one of my favorites.

PCAGOE March Challenge is up and ready for voting


I have been really as of late and my poor blog got put on the back-burner. Sorry about that. Since I last posted I have been accepted into the Polymer Clay Artists Guild of Etsy and couldn’t be happier. I’ll be posting some Guild things here for you to see what I’m up to. I’ve also been trying to perfect my tutorial making skills. There’s a March challenge going on at the moment and it would be great if you could check it out and cast your vote for your favorite. Some really nice pieces by very talented people and worth the time to look and vote for sure. http://polymerclayartists.blogspot.com/2012/02/march-challenge-bold-graphics.html

The PCAGOE is a wonderful group of talented people and I feel honored and fortunate to be included in this group. I’m sure I’ll be learning tons of new things as I interact with everyone there.

Have you checked out the new issue of The Polymer Arts magazine yet? I did, and I must say it’s a fantastic read and full of wonderful information and stunning pictures! It’s a must read for the serious Polymer clay artist in my opinion and it will only get better over time.  I love the cover photo!  

Here’s a link to the sample flipbook so you can see for yourself how wonderful it is.  http://thepolymerarts.com/SampleIssues.html

 Here’s a couple of pictures of what I’ve been working on since I last posted. I’m learning more and more about sculpting with polymer clay and am eager to start sharing what I’ve learned with you. This week I will be posting another tutorial. I’m working the kinks out now but in the meantime, be sure to check out the links above and enjoy. Happy Claying, Tamara/Irrysistable Jewels


How to make a polymer clay Sand Dollar


Hello and welcome to my little studio here at Irrysistable Jewels 🙂

I’m working on a new polymer clay necklace to add to my Etsy store and thought I’d take a breather and teach you how to make a Sand Dollar out of clay. It’s easy and anyone can do it! Nothing in nature is identical so only happy accidents can happen, therefore you can do this one without fear.

First you’ll need some polymer clay. I personally use sculpey but any clay would work. I’ll be exploring the different kinds of polymer in the near future. Make sure your clay is well conditioned and ready by working it in the palms of your hands until it is soft and malleable.

As far as tools go, you can use whatever works best for you. I started out with only a pocket knife and a toothpick but my dear Husband bought me some carving tools for Christmas, so I have graduated to using those now. I’m a firm believer in using whatever you can find that will give you the effect that you’re looking for though and have used some pretty unconventional items in my creations.

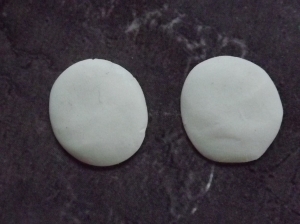
Pinch off enough clay to form the size of Sand Dollar you’re thinking of and form that into a small ball. Create one more small ball  and flatten both out until they are pretty close to the same size. Don’t worry about the edges at this point. No need for a perfect circle here.

Now with whatever you chose for a tool, I am using a clay stylus here, create the little star flower shape on the top of one of the circles. Usually there are five petals and smaller petals inside those, but this is your Sand Dollar so be creative here if you’d like. I created little dots in the center of mine with the stylus.
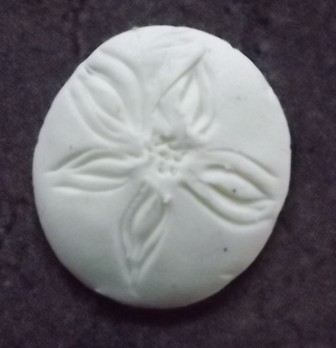
carve the 5 petal design into the the clay but not all the way through, just enough to indent it

Now take the Sand Dollar you just marked and dome the underside a little. You can do this with just your finger. Just a small dome though as Sand Dollars are not flat and not extremely puffy either.

Use either your finger tip or a ball stylus to gently dome the clay you just carved

Attach the other flattened circle to the bottom of the domed piece and carefully pinch the seams together until the seams disappear. 

pinch the seams gently until they disappear, your dome will flatten a bitcut out the holes through both layers carefully trying not to disturb the imprints

Very carefully, with a razor blade or sharp pick, cutout the holes through both layers. A little tricky to do without messing up the top but just be gentle with it and you’ll have a gorgeous Sand Dollar. At this point, you could add anything you’d like to the top, like stones or crystals. Make an indention as big as the stone and glue the stone in after the baking process or leave the stone in place and anchor it with more clay. Either way works, but I find that taking the stone out and glueing it back into place shows more of the gem and it’s my preference.

I’m not sure how most people go

Add paint,glitter or indentations for stones. Whatever you want at this point, it is Your Sand Dollar and should reflect your own personal style

about this next phase but personally I like to paint my pieces before I bake them. At this stage  you can add some glitter,paint or more texture. I added some pearl paint, a little copper glitter and a slight dusting of peach powder to this one. When you’re happy with the outcome, pop it in the oven on 275 degrees(if you are using sculpey clay, check the type of clay for the instructions on baking what you are using as all are a little different) for about 35 minutes. 

I will typically add more details to mine after it’s taken out of the oven until I get the desired effect and then cook it again. I like to seal my pieces with a clay sealant before I add any embellishments like gems, or stones.  Let your piece dry and set before adding it to any jewelry components. I am so impatient, I had to learn this the hard way!

I’d love to see your  finished Sand Dollars. I’m hoping to do many more this year and I promise I’ll get better at them. Maybe I will learn to do a video as well in the near future. I hope you enjoyed this tutorial and have fun making your own Sand Dollar. I’ll post my finished necklace as soon as it’s finished so you can see how I used my sand dollar in Jewelry.

Polymer clay Lion Completion


Happy New Year!! I have a feeling this will be a great year for me since I love what I’m doing and have a clear direction and goal for myself. I’m loving how this Lion is coming along although I should’ve taken a few more shots for you before I moved on. It’s hard to stop the process and take pictures but I’ll get better at that on the next one.

Ok, so yesterday I made the head and added some highlights and then baked it, which means the mane is next. I tried to carve the mane out of a lump but didn’t like the look that way. Instead, I chose to use little ropes of clay and attached them to the back of the head.

Polymer clay Lion

I took out some acrylic paint and dabbed it all over the mane before adding a sprinkle of glitter in a copper color.  Actually, I added the eyes (which are black rhinestones) a little too soon in the process and would suggest waiting until you are happy with the rest before adding them.

Now back into the oven to bake a bit more. 275 degrees for about 15 min this time, just to set the paint and the tendrils in place.
 
He’s looking pretty good so far but I think it needs some more tendrils between the ears and a little more blending on his face.

Finished Polymer clay Lion

Now, that looks much better. I did end up removing the eyes and replacing them with new stones because I noticed some glitter on them and didn’t care for it. Like I suggested, add the eyes last! This is still new to me and very much a learning process. I love the way it came out in the end and actually have learned alot by just creating and fiddling around with the clay until I got it looking just right.

 
I would tell anyone wanting to try this to just jump on in and don’t worry about any mistakes( happy accidents). Sometimes they work to your advantage. You can always just ball up the clay and start over if you aren’t happy with it.
 
Now it’s time to turn this piece into a beautiful art necklace. I’ll probably just get that done and share a finished photo with you sometime today.
 
I plan on making another clay creation soon and already have the idea drawn out. I’ll try to get a better step by step progression on the next one so maybe you can follow along and make one too if you’d like.

Featuring B’Sue Boutiques..come on in and meet her. You’ll love her!


Ok, today I am going to tell you about a Wonderful Lady I have met recently. Her name is B’Sue and she runs B’Sueboutiques. I can honestly say that she is the nicest person I have had the pleasure of dealing with since I started my Jewelry designing venture. You just have to go check out all the informative videos she has on you tube. I have learned so much in a short amount of time and my creative juices are on overdrive now.

Her jewelry is outstanding too and she’s just an inspiration to me what can I say, I really, really like this woman. Not just becasue she is so helpful and nice but because she loves what she does and it really shows in her work, videos and the way she deals with people.

One of B'Sues beautiful pieces


I spent hours last night just watching her videos and  learning as much about my craft as I can. They’re fun and informative, so do yourself a favor and check them out and then head on over to her boutique and grab some terrific things at GREAT prices and start creating. 

A few days ago I joined her new Creativity group on Flickr too. You should come join.  B’Sue makes these all so much fun you just can’t stop wanting to learn more. I’m telling ya, she’s the bomb guys and I am so thankful to have found her and you will be too if you are a jewelry artist, especially if you are  just starting out.

A Gorgeous Necklace by B'Sue